之前处理北美五大湖的数据,湖表温度为卫星观测数据,官方有提供.asc文本格式的阵列像素数据,但是缺少地理坐标信息(这也是比较麻烦的地方,需要自己根据已有的信息进行坐标转换),官网并没有相关的地理数据文件,只有一些描述性的文件。Great Lakes Surface Environmental Analysis(GLSEA,https://coastwatch.glerl.noaa.gov/glsea/)
不得已就采用这些零碎的信息,最终也获得了像素文件相匹配的经纬度信息,但是方法比较繁琐,采用ArcGIS来转换的(此处,感谢南大环境学院博士生YJ鼎力相助!),先转换为shapefile相关文件,再导出latlon为.csv文件。好在把图用NCL画出来匹配度还可以,就基本用起来了。但是作为一个没有Windows电脑的人,用ArcGIS显得很笨重又奢侈。后来就发邮件给数据负责人,是一位很热心的华人管理员,就把包含地理信息的.tif文件发给我了。对于我完全没有什么相关坐标转换的经验,但也不能浪费这个.tif文件,潜意识告诉我,这个应该有更加优雅的解决方案。于是另辟蹊径,算是把这个问题再一次解决了。
后续,我会单独给出地理坐标信息完整的geotif文件转换方式,相对简单,基本一键式操作。
测试数据>>>链接:https://pan.baidu.com/s/1UElL2Gv9PHb0-Qm0Yoy4mw
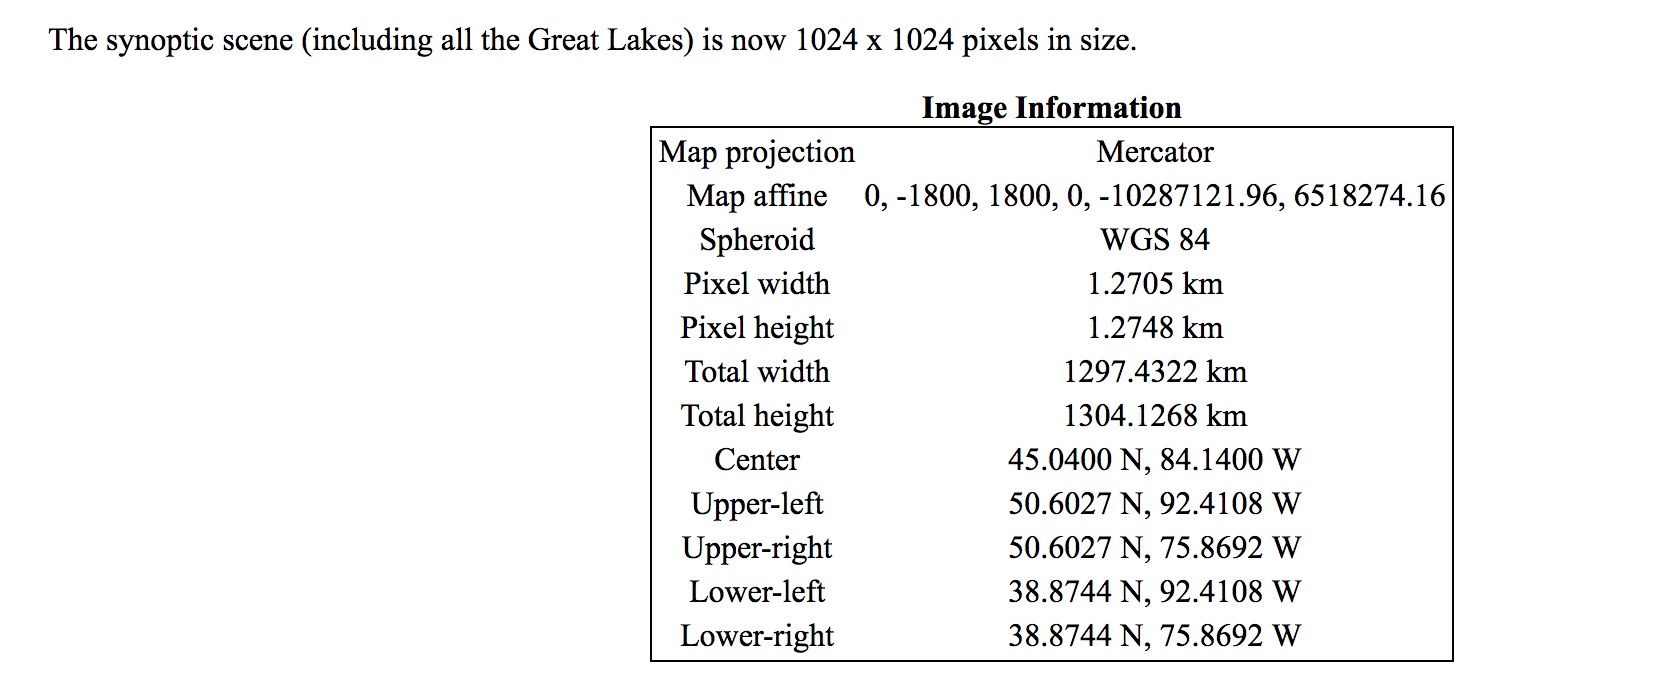
官网的地理描述信息
优雅转换.tif文件到经纬度.csv文件操作流程
需要的库/软件
1.cs2cs; 2.R语言; 3.gdal; 4.NCL (操作环境为macOS或者Linux)
查看tif文件信息,确定地理坐标
进到R语言的终端环境:
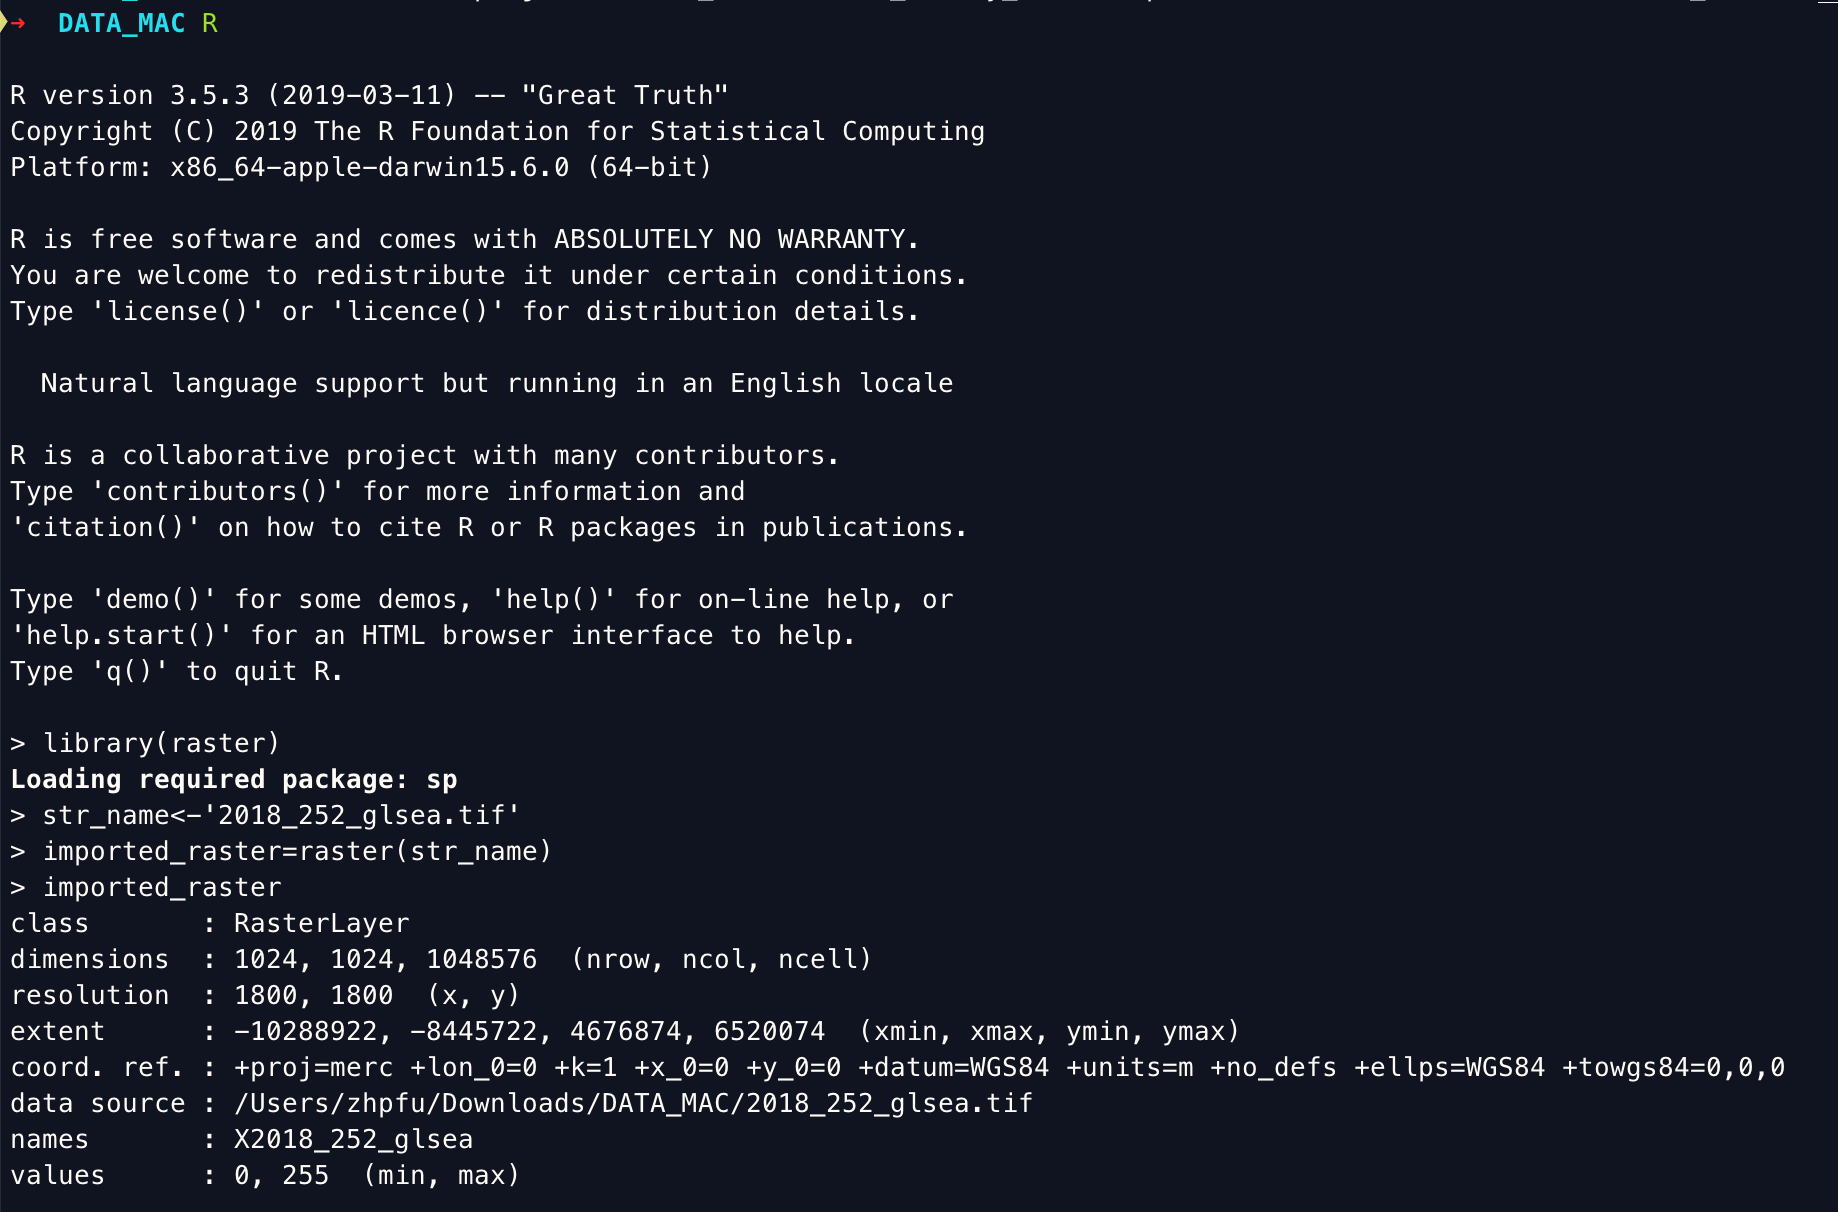 #### 以上可以确定这个tif文件是附带了地理坐标信息的
转换过程
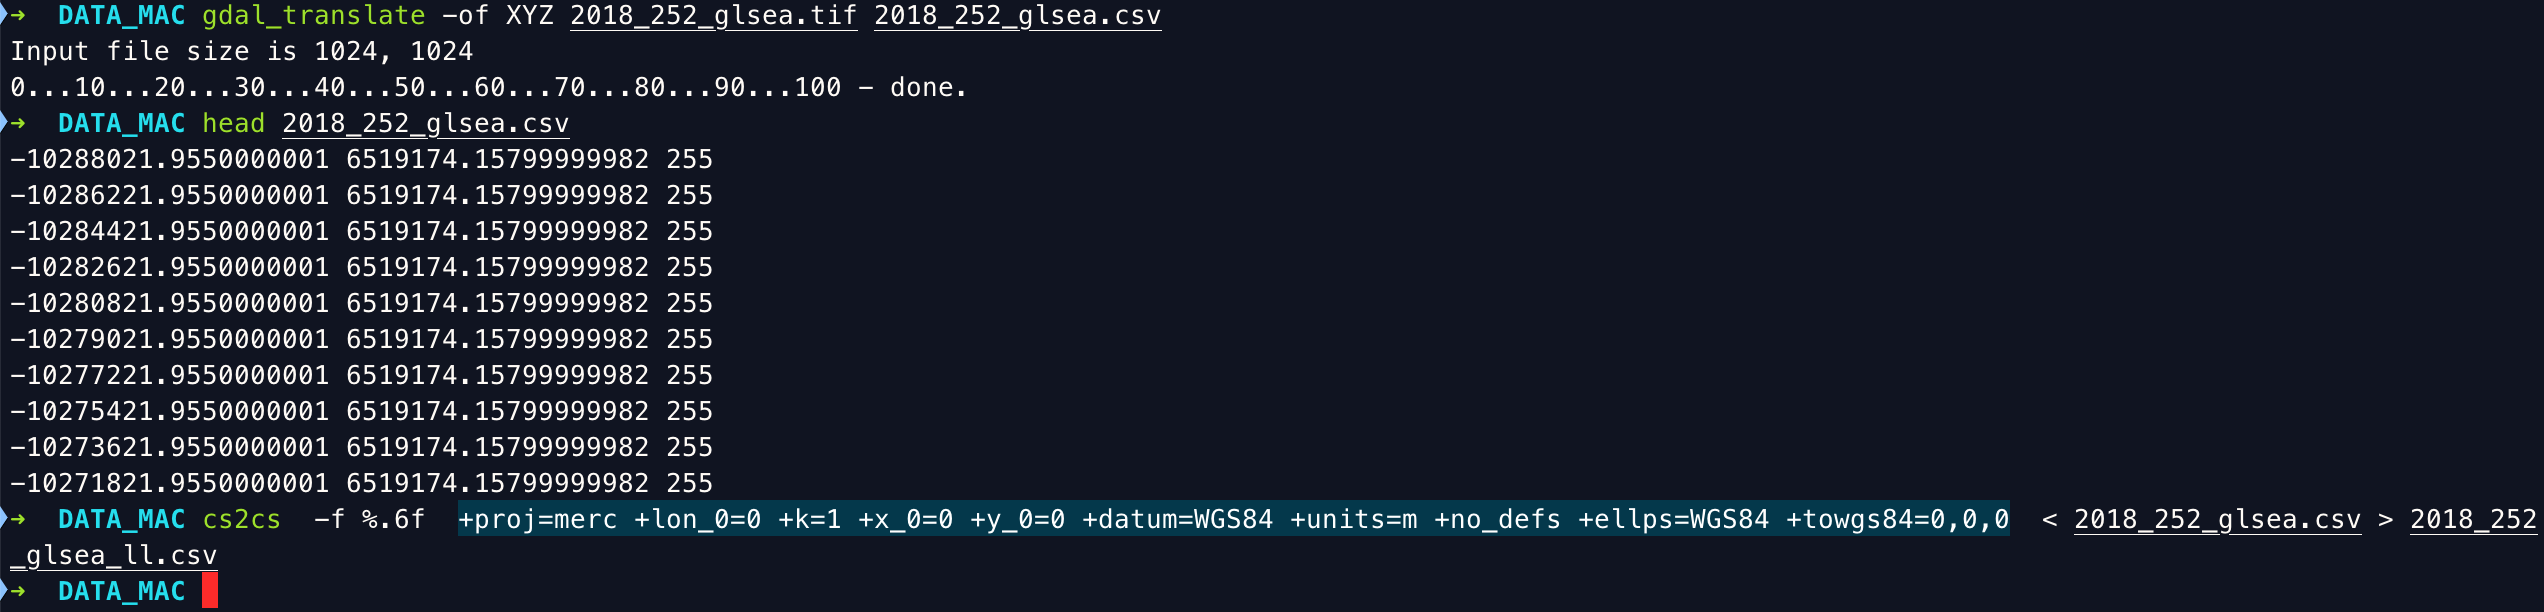 ##### 1.参考[点击·stackexchange](https://gis.stackexchange.com/questions/277780/transform-data-stored-in-a-tiff-file-to-a-csv-with-latitude-longitude-and-data)上的方法。再结合上一步的地理坐标信息,使用cs2cs来进行转换。
##### 2.参考[点击·cs2cs介绍和转换模板](https://mygeodata.cloud/cs2cs/)
##### 3.参考[点击·在R中读取.tif文件](https://codeday.me/bug/20181220/457615.html)
##### 1.参考[点击·stackexchange](https://gis.stackexchange.com/questions/277780/transform-data-stored-in-a-tiff-file-to-a-csv-with-latitude-longitude-and-data)上的方法。再结合上一步的地理坐标信息,使用cs2cs来进行转换。
##### 2.参考[点击·cs2cs介绍和转换模板](https://mygeodata.cloud/cs2cs/)
##### 3.参考[点击·在R中读取.tif文件](https://codeday.me/bug/20181220/457615.html)
经纬度展示
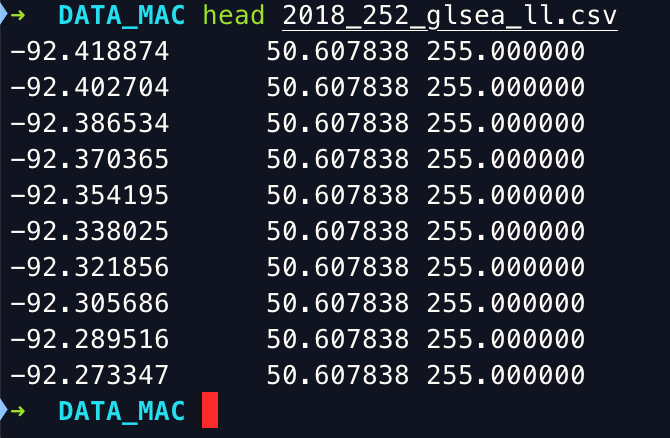 ##### 和实际北美五大湖的范围是匹配的。
绘图检验
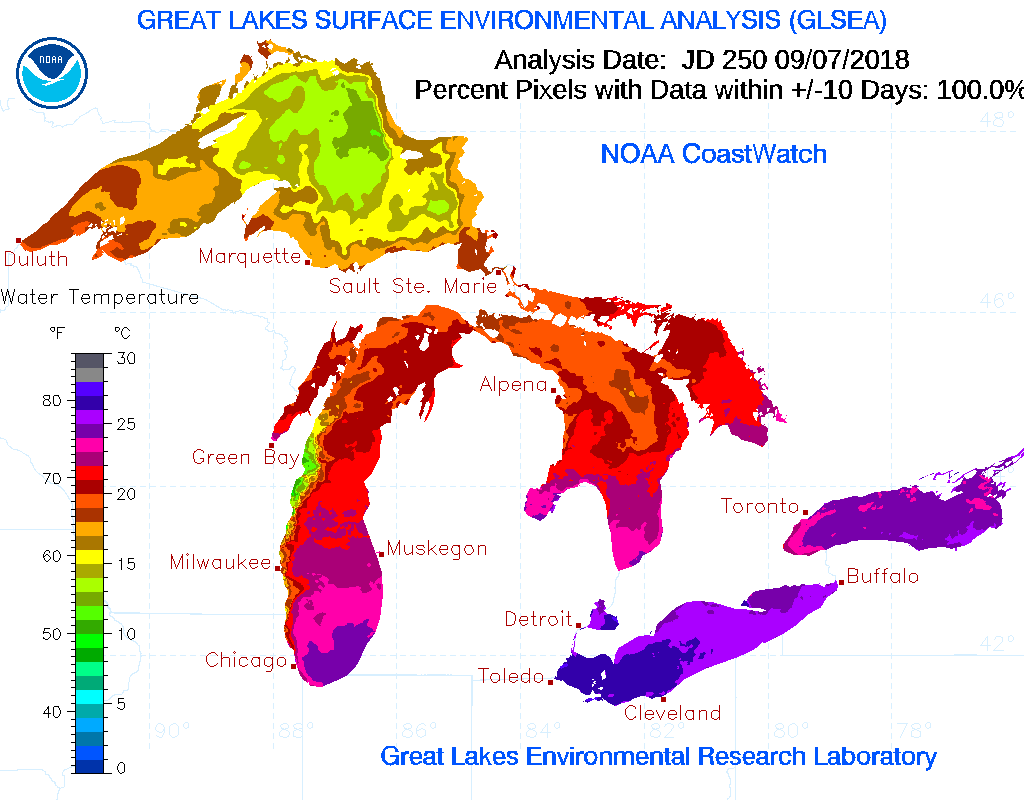 ##### 上图为Great Lakes Surface Environmental Analysis(GLSEA)官网提供的样图。
上图为原始高分辨率的湖表温度图
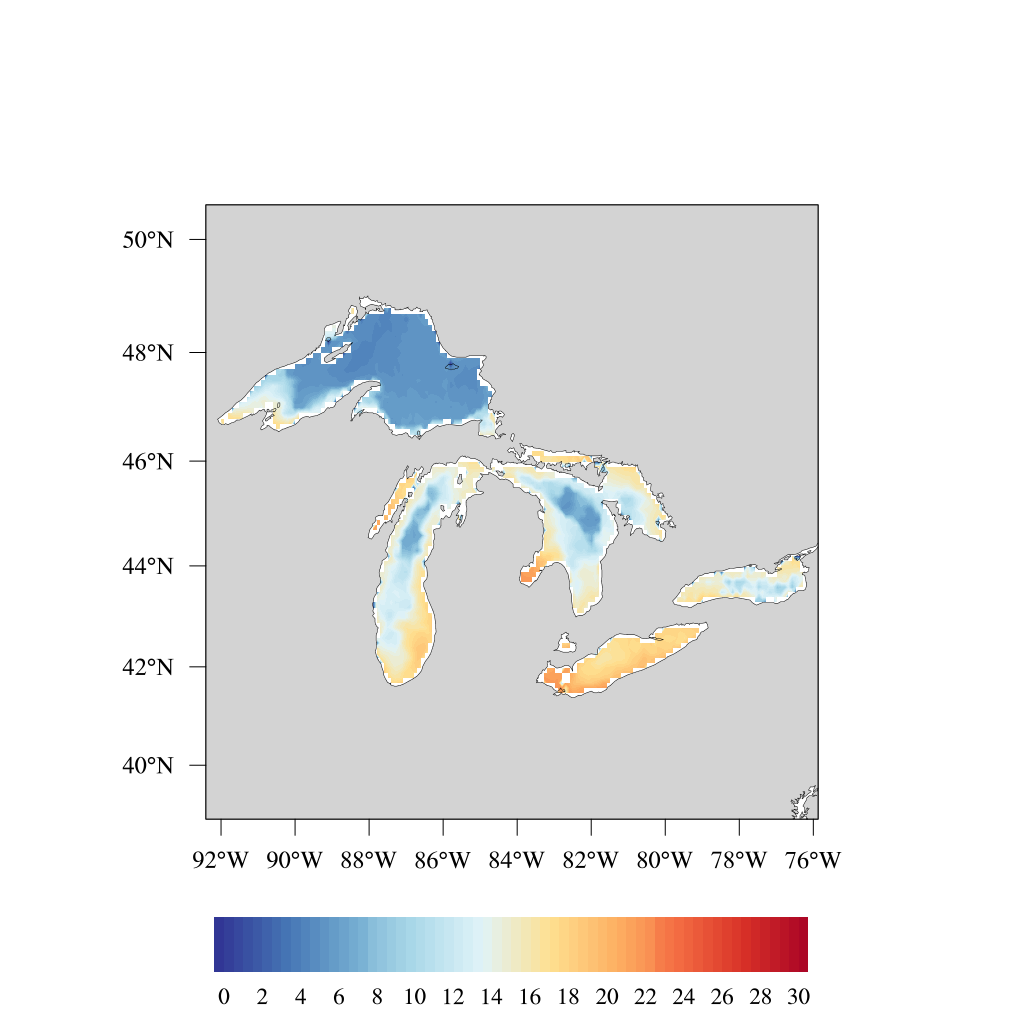
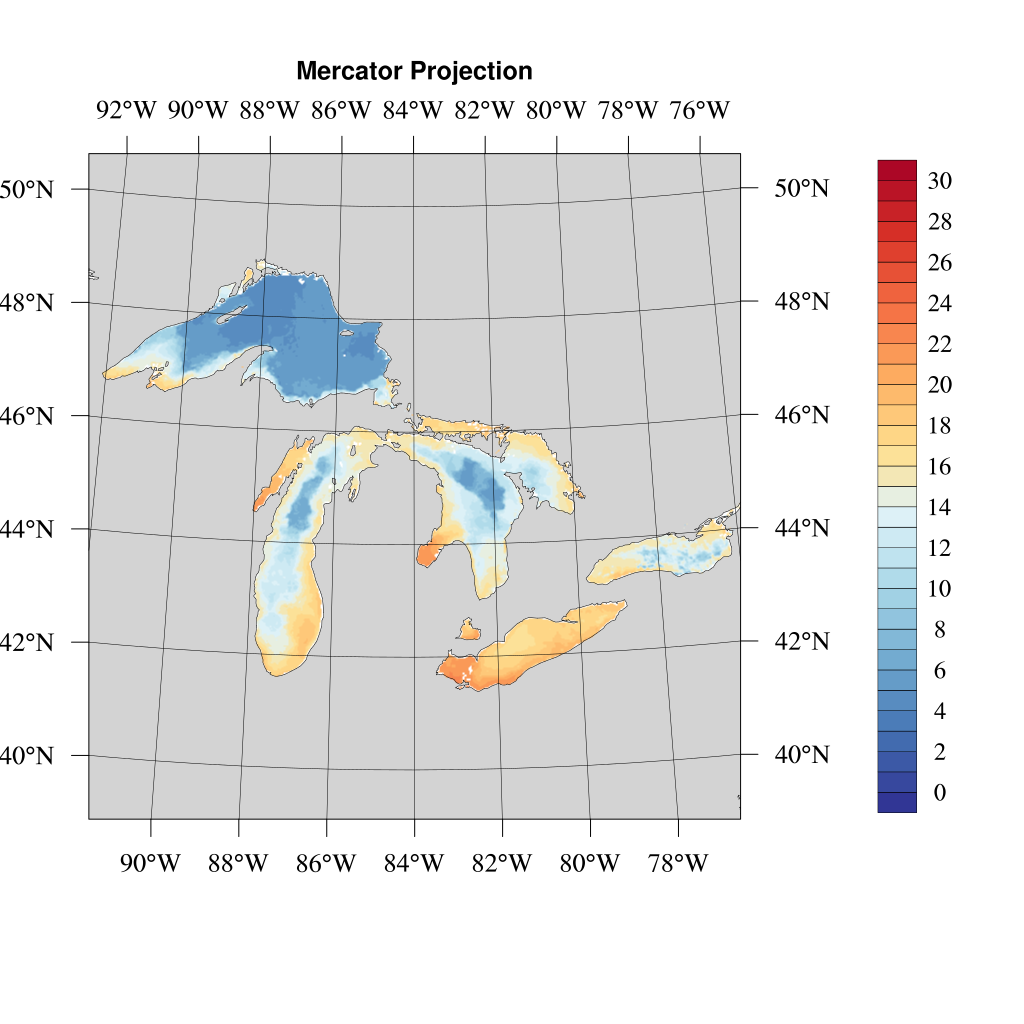
上图为0.1°分辨率经纬度格点数据绘制的湖表温度图,可见匹配关系很不错
综上就是处理数据的部分流程,重点是格式转换,比较初步的工作,如果有需要将这一套卫星观测数据处理为经纬度格点的netCDF文件存储,可以和我私下交流(邮件/微信)。上面的几步基本涵盖了数据处理的基础性工作了。
需要安装gdal
Ubuntu/Debian 下:
1
sudo apt-get install gdal-bin
CentOS/Fedora 下:
1
sudo yum install gdal
Windows 下,到 http://www.gisinternals.com/ 下载安装包,安装后命令位于 C:\Program Files (x86)\GDAL\gdal_translate.exe。如果偶尔用一次,直接用 命令的完整路径即可;如果经常使用,可以将 C:\Program Files (x86)\GDAL\ 添加到环境变量 PATH中
macOS High Sierra下:
1
brew install gdal
ok!!!假若你已经安装完毕了!需要测试数据的可以私信我!我百度云盘分享给你链接!
1 | ➜ Downloads gdal_translate -of netCDF -co "FOMRAT=NC4" mosic1.tif mosic1.nc |
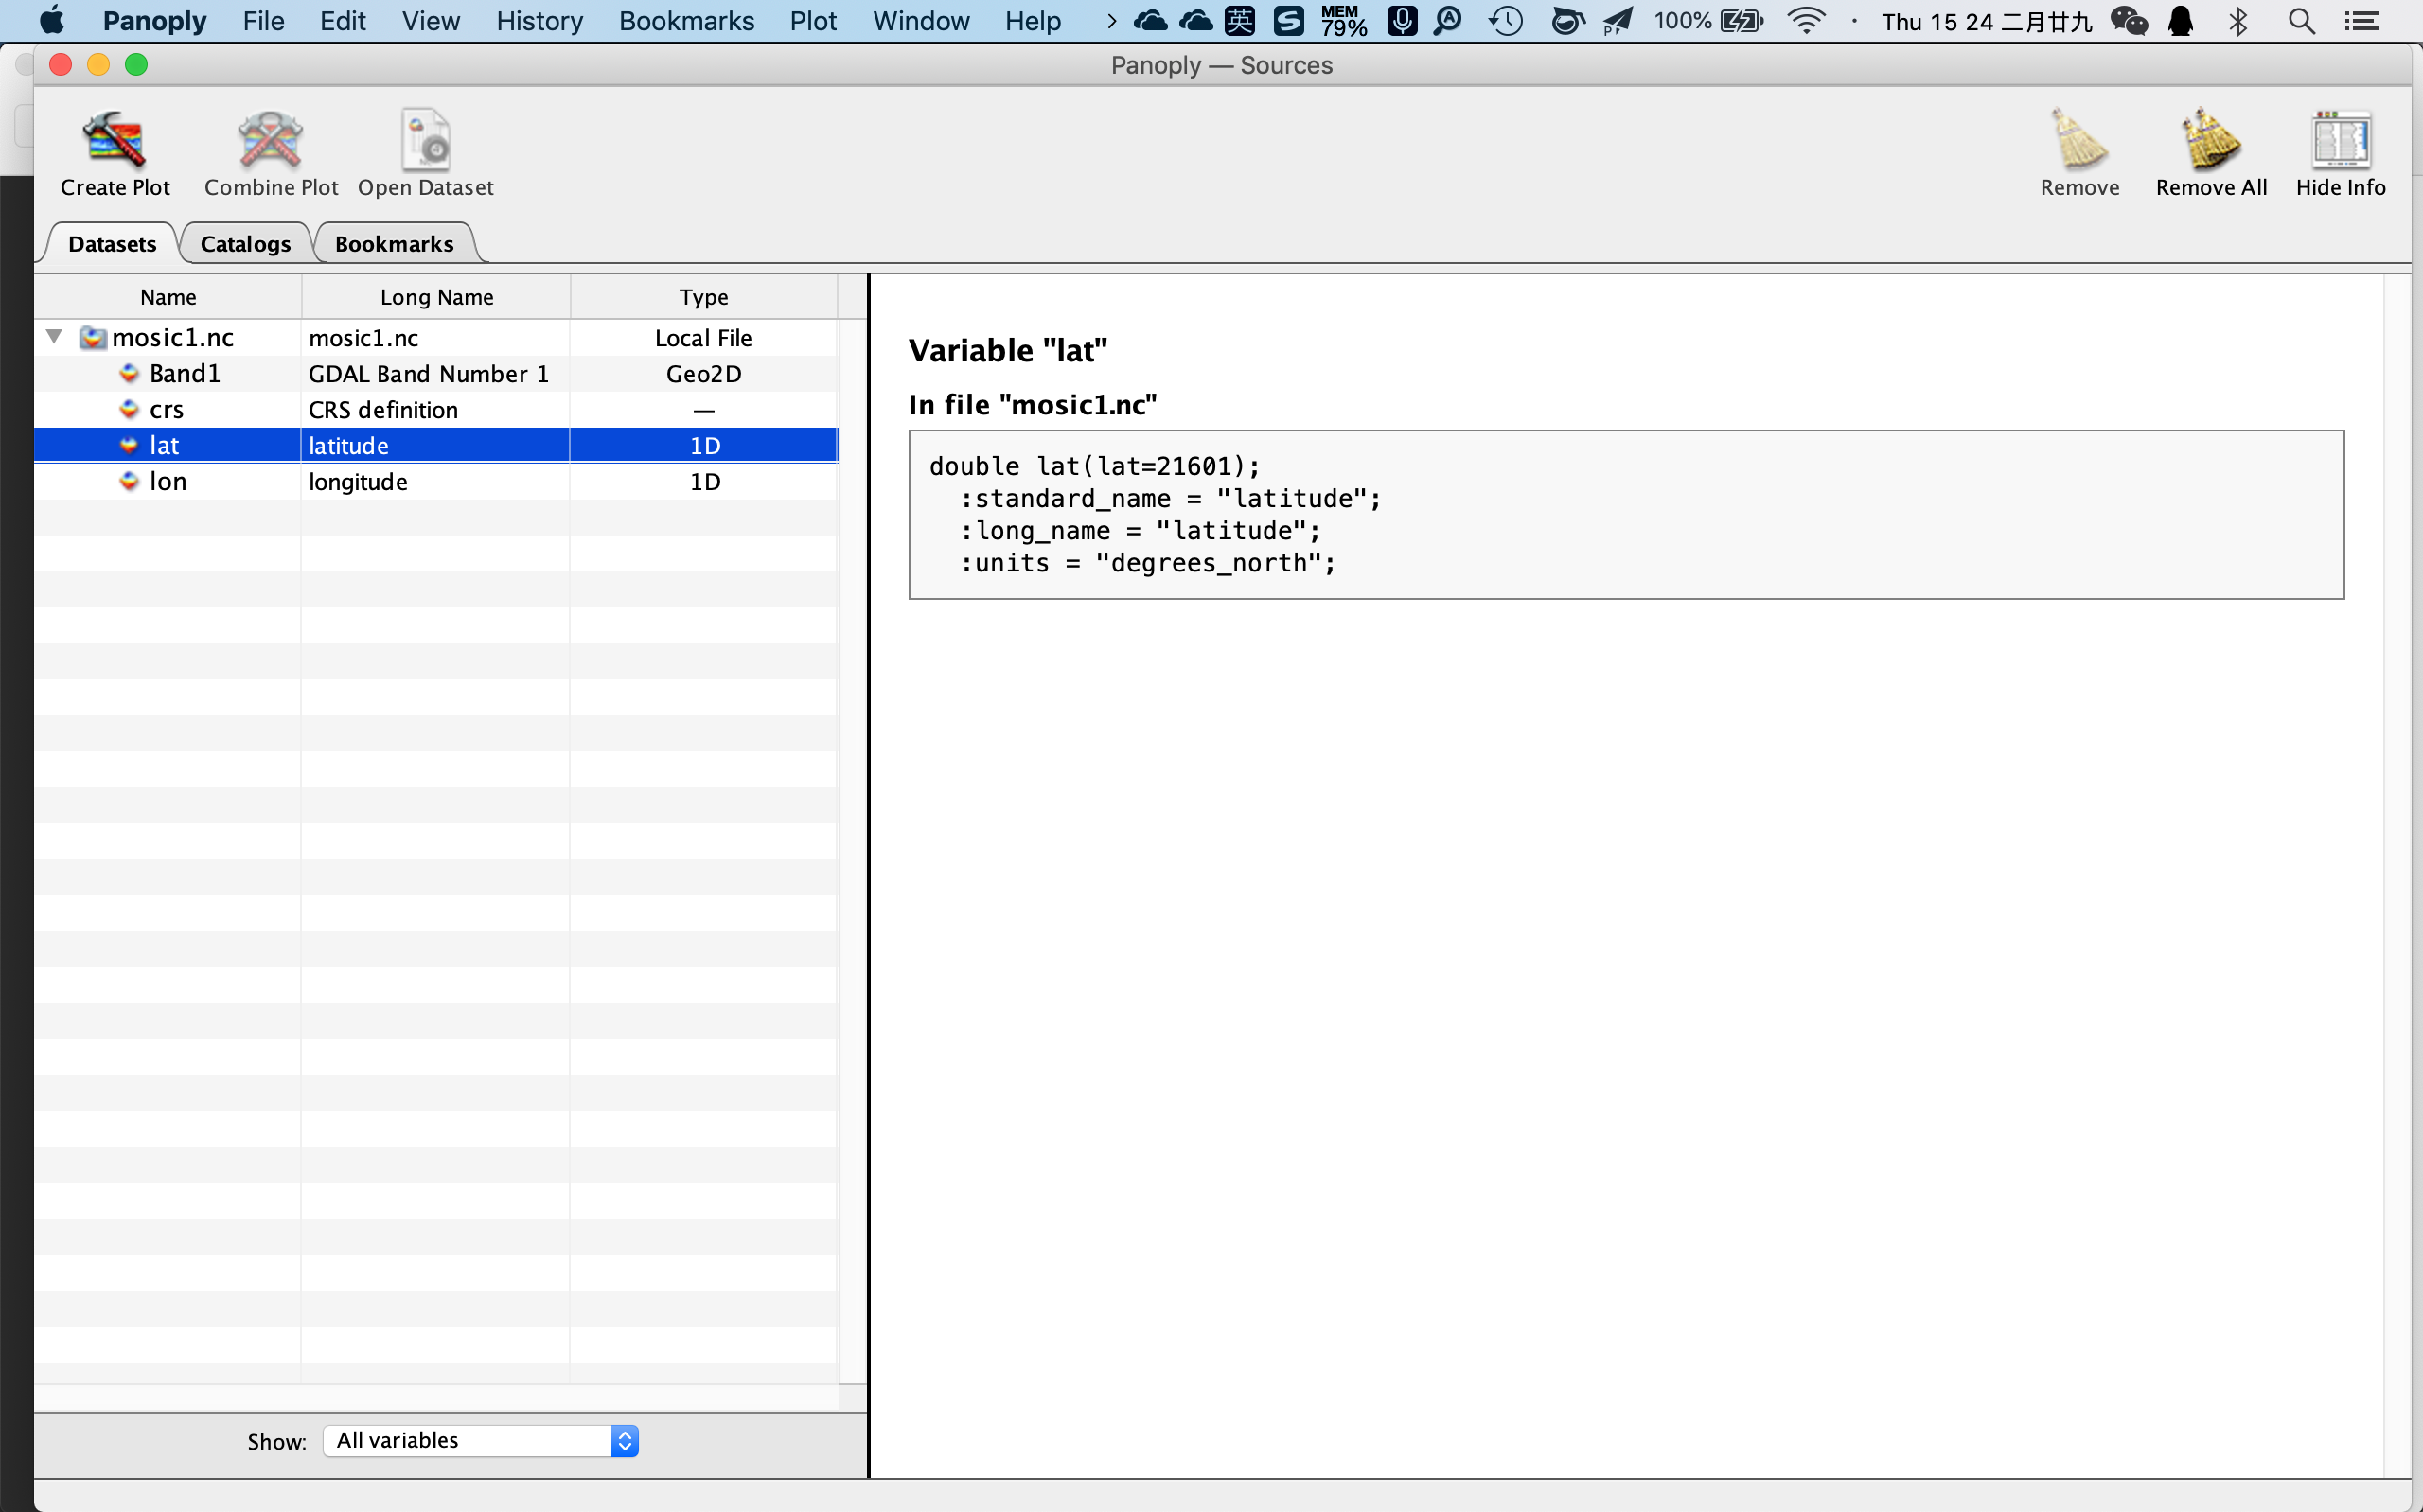
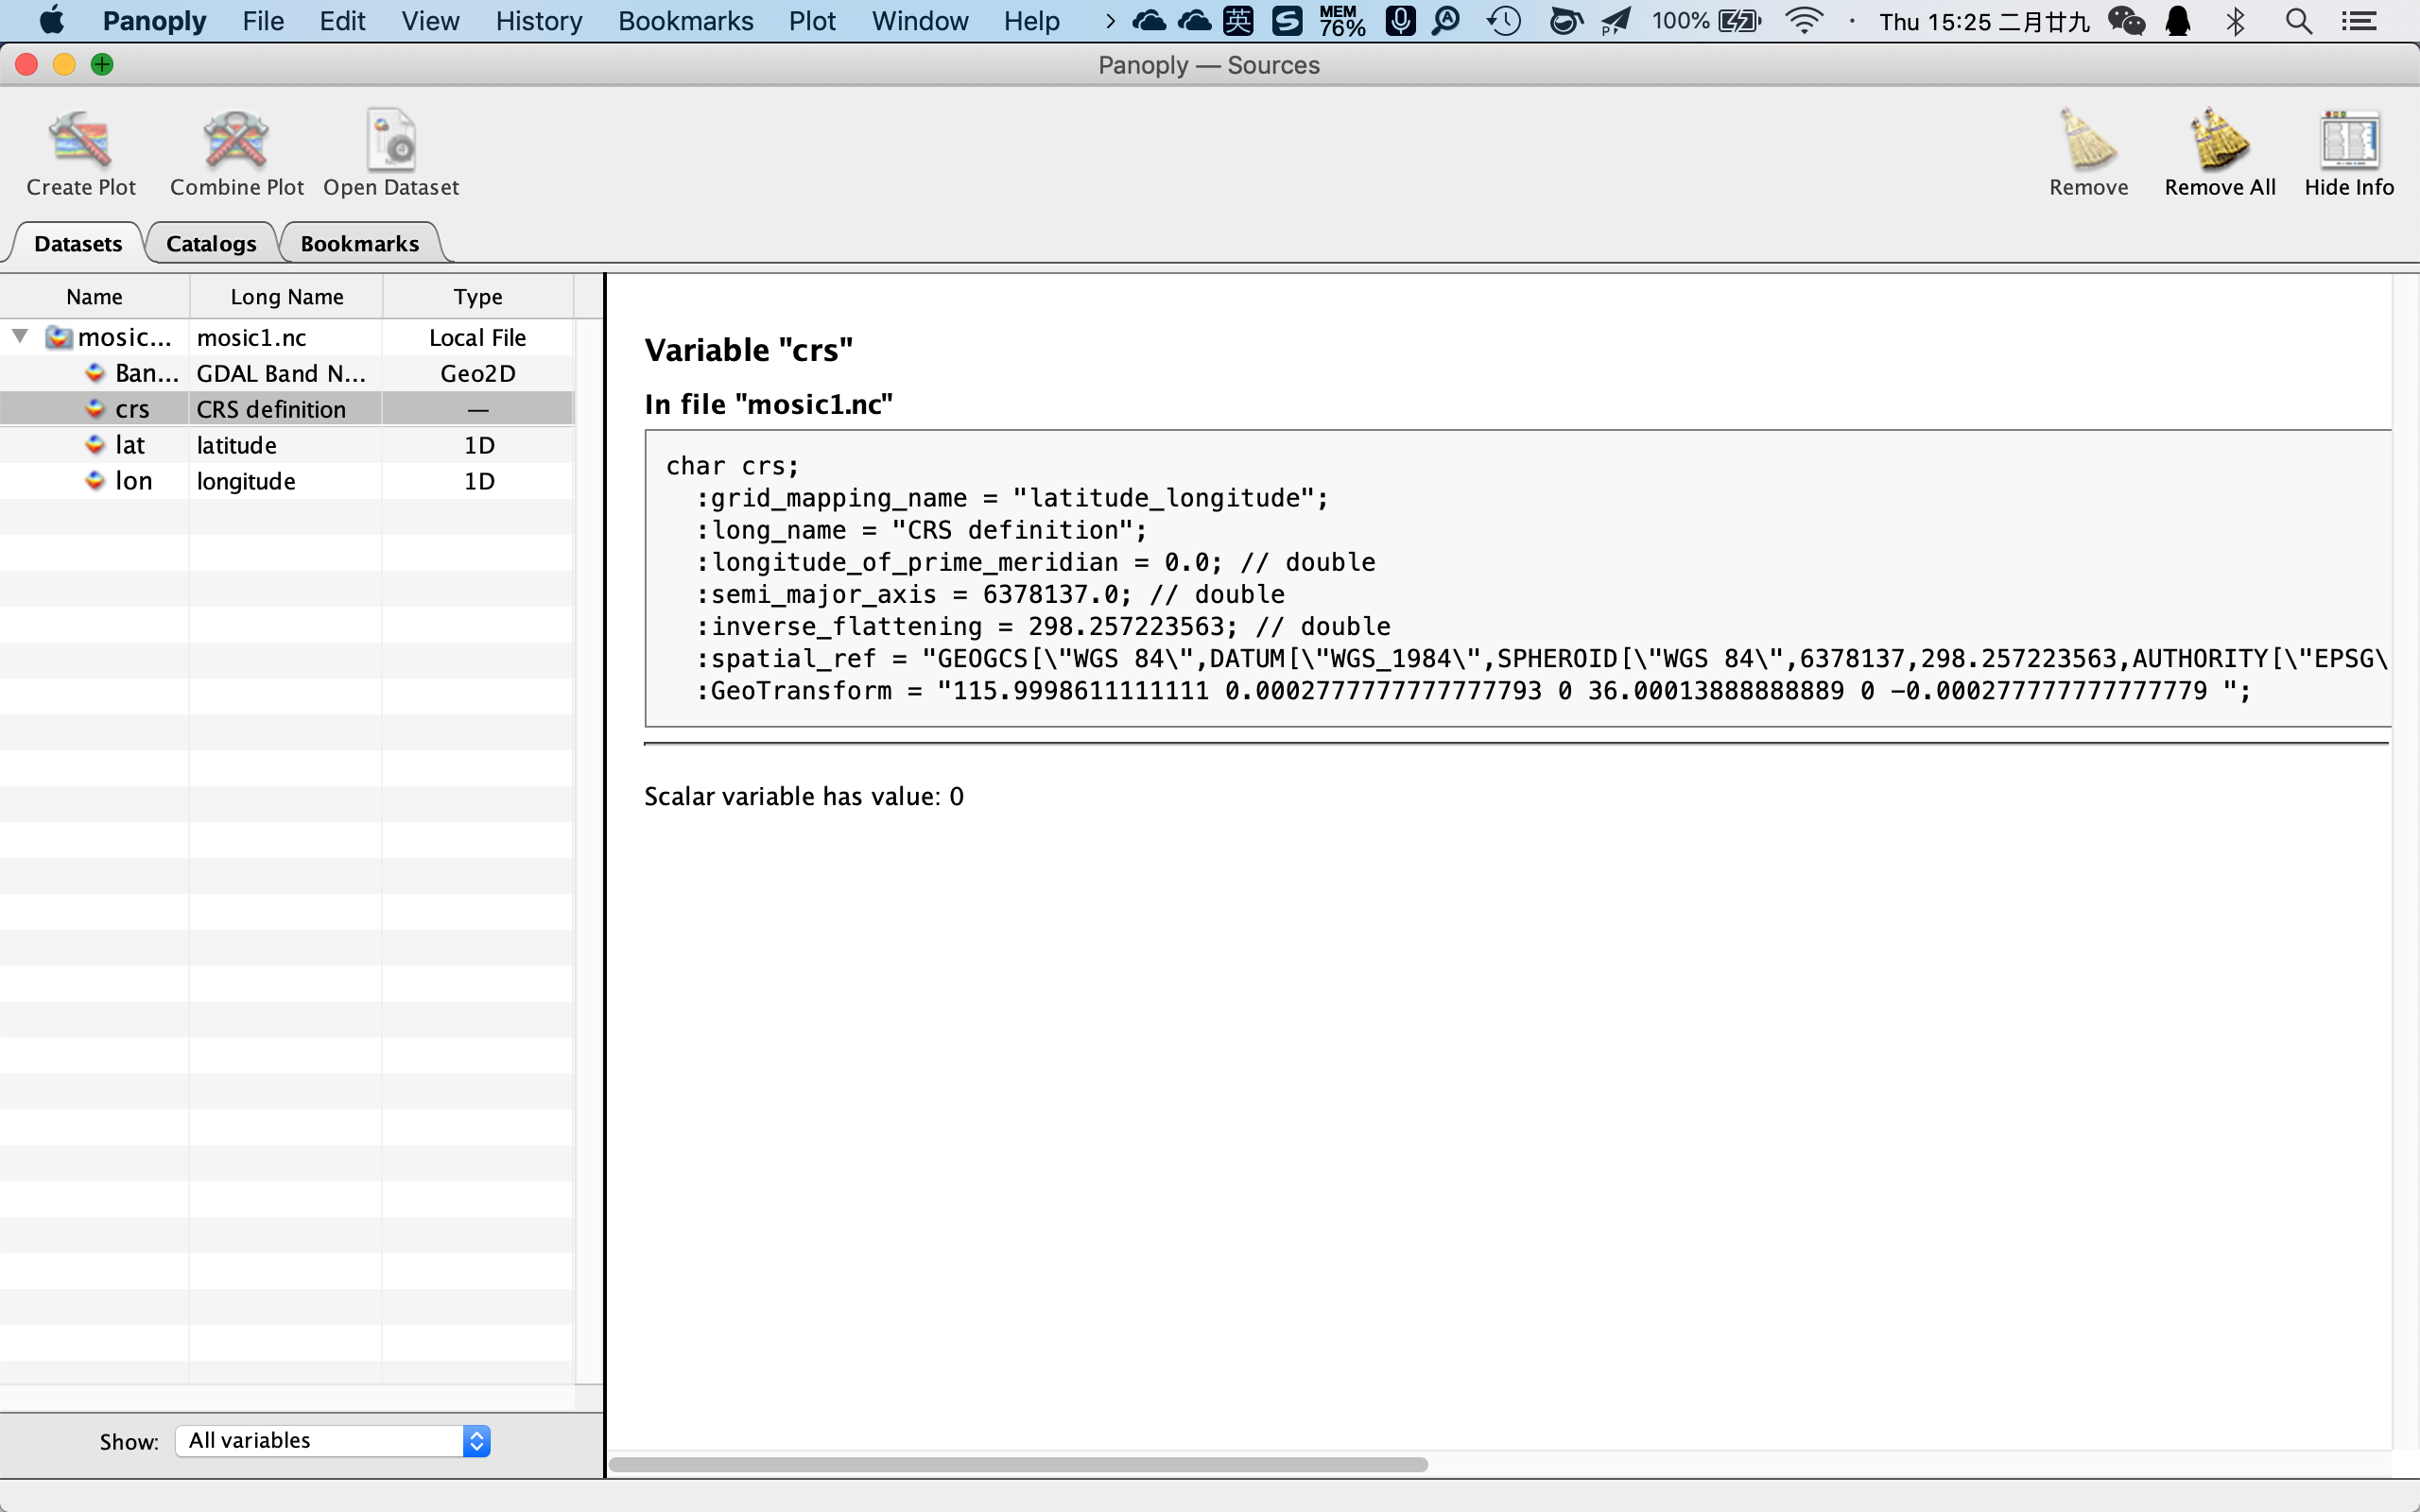
1 | ➜ Downloads ncdump -h mosic1.nc |
gdal_translate 的语法如下:
1 | Usage: gdal_translate [--help-general] [--long-usage] |
-of 后接要转换的数据格式(可能需要新一点的gdal版本才能支持更加丰富的格式转换!),使用 gdal_translate –long-usage 可以看到,支持的格式如下:
1 | VRT: Virtual Raster |
也可以用Python,这样conda install gdal 一键式安装,适用于多种平台
1 | import glob |
当然有时候需要将netcdf的.nc文件转换为带地理坐标信息的.tif文件,也是如法炮制!
1 | library(raster) |
或者
1 | gdal_translate -of GTiff file.nc test.tiff |
and using the -b option will allow you to specify which band you want to convert.
1 | gdal_translate -of GTiff -b 10 file.nc test.tiff # to get 10th band |
TIF, TIFF, GeoTIFF区别:
Adobe Tagged Image File Format (TIFF or TIF, same thing) is so universally used as a format for imagery that few people know it is a Adobe format. TIF files can contain tags, additional items of information, that can be used to extend the standard for different purposes. Software that does not understand how to use extra tags simply ignores them. Manifold can read and write TIF files. TIF is a very popular export format for interchanging images. Manifold also reads BigTIFF, an extension of TIFF format to handle TIF images that are larger than 4 GB.
A GeoTIFF is a TIF file that ends in a three letter .tif extension just like other TIF files, but a GeoTIFF contains additional tags that provide projection information for that image as specified by the GeoTIFF standard. When Manifold reads a TIF that contains GeoTIFF tags, the system will automatically capture that projection information to assign to the image. When Manifold exports an image to TIF format, Manifold always writes GeoTIFF tags into that file to specify the projection that image used within the Manifold project. TIFs created by Manifold therefore are always GeoTIFF compliant TIF files. When Manifold exports a TIFF bigger than 4 GB, it is automatically exported as a BigTIFF.
【参考】